Thursday, October 6, 2011

Hot Bacon and Crab Dip


One of my favorite parts of subscribing to The Food Network magazine is the 50 Things to Make with ( fill in the blank...) section. Well September's issue did not disappoint, "Bacon" was the topic and of course I wanted to make all 50 right then and there, but come on that would be bacon overload... or would it??   Because really what can’t you do with bacon remember my post about The Big E, and the chocolate covered bacon, Bacon really does make everything better!! I had made this in August for a family dinner when my brother and his family were visiting from New York. It was a big hit along with some other dips that I made, and so we decided to make it again for Sunday Funday. It is not only easy peasy but absolutely delicious and would be great for a party. I made mine with Flatouts cut up, and baked in the oven and they are so good. You could use any type of scooper you wanted really or even some French bread sliced and baked lightly. Either way it is so good that there won't be any leftover ( boooo)  which was sad but that just means we will have to make it again!!


Hot Bacon and Crab Dip slightly adapted from Food Network # 31 on the list

Preheat oven to 350 degrees 
Items Needed
Cookie  Sheet
Baking Dish
Prep time: 10 mins 
Cook time : 5-7 mins Flat outs
         30 mins dip

  • 8 oz cream cheese
  • 8 oz canned crab meat, drained and gone over for shells
  • 1 c crumbled bacon
  • 1/2 c mayoniase 
  • juice of 1 lemon
  • 1 pkge Flat Outs 
  • olive oil
  • seasoned salt 
  • cayenne pepper

  • Cut the flatouts into triangles and brush with the olive oil then sprinkle with the seasoned salt and the cayenne pepper bake for 5-7 mins until crisp 
  • Mix the first 5 ingredients together and spread into a baking dish and bake until bubbly about 30 mins 

Eat and Enjoy!!


Thursday, September 29, 2011

Another year another Birthday……

My beautiful flowers that were waiting for me when I woke up!!

So I am now officially on the wrong side of 30… half way to 40 really…I celebrated yet another year yesterday! This can’t be happening.. I remember thinking how old that must be and now I am here. Its been downhill all month too.. First it was the eyes, I had to get new glasses, as if I didn’t feel old enough the doc said “ wow your eyesight has definitely changed since your last visit." Thanks Doc..  Are you trying to tell me I’m getting old??? I also had to have hernia surgery two weeks ago and have been walking around like an old hunched over lady.. so of course my friends and family had to rub it in that I was getting old… So because of the surgery and the fact that I am still a hurting unit, we didn’t do anything crazy to celebrate just a nice breakfast and a relaxing drive, the weather was beautiful and I haven't really been to of the house much lol 


We went to breakfast at a local spot and of course I made sure what we ordered we could split, and they were oh so yummy!! 


Baked Apple and Chunky Monkey Pancakes!! 


Oh my these were good!! The Baked Apple is so delicious and was a huge portion so of course what does a birthday girl do? Bring the leftover Baked Apple home and had it for dessert with some ice cream YUMMY!!!

All in all it was a great birthday!! I am also officially counting backwards starting with the next birthday, who's with me??!!??!!??


Saturday, September 24, 2011

Taco Turkey Burger


With the summer winding down, and the colder weather coming in we have been trying to grill as much as possible. This is one of those oh my gosh what are we going to eat for dinner type of recipes, and since I had some turkey on hand it was really a no brainer. Well the burger idea was a no brainer but what kind of burger was another story. We had just had Teriyaki Burgers so that was out, and I was craving Mexican so why not a taco burger. And boy am I glad I made these yummy burgers definitely a keeper recipe. Here's a little secret to getting your burgers seasoned right; test them by making a tini tiny burger and cooking it in a frying pan and tasting it because really how else can you tell if the seasoning is right.. Well besides eating raw meat.. yuck... I do this with meatballs too, I was always under seasoning them and now that I think about it not a bad idea for meatloaf either. After tasting my tini tiny sample I decided it needed a little something.. I decided on two spoonfuls of salsa added to the meat micture. Ah perfect! 


Taco Turkey Burger 

Item Needed
Grill
Serves 2
Prep time  5 mins
Cook Time depends on desired doneness  

  • 2-3 tbsp taco seasoning
  • 1/2 pkg. ground Turkey
  • salt/pepper
  • Wholly Guacamole,optonal
  • 2 spoonfuls salsa 
  • Salsa Topping,optional
  • Cheese,optional
  • Banana Peppers, optional
  • Sour Cream, optional

  • Season turkey with the taco seasoning, salt and pepper, and two spoonfuls of the salsa then lightly mix it all together and form 2 patties and press a thumb print in the middle (so it doesn't puff up)
  • Now make your tini tiny burger and fry it up.. give a taste, is it ok or does it need more? Add more if it needs if not head out to the grill
  • Grill patties over medium high heat for 5-8 minutes per side, depending on desired doneness  
  • I added a slice of Monteray Jack cheese 1 minute before pulling off the grill
  • Top with your favorite fixin's 

Eat and Enjoy!!

Wednesday, September 21, 2011

Potato Au Gratin


I am a big fan of comfort food, as you may have gathered from some of the recipes on this blog. One of my favorite comfort foods is pretty much anything to do with a potato really, because lets be honest they are just so fluffy and creamy and of course yummy! Now as a kid I remember my mother making this dish but mostly for special occasions and I can see why as it is a bit labor intensive. Now if you have mandolin its easy peasy, which I did, so this went by pretty quick. But it is oh so worth it with this creamy, cheesy bubbly goodness. I found this recipe on Food Network and pretty much followed it to a T, except some extra cheese for the top to get that crispy, bubbly, gooey, cheesy top.

Items Needed:
Baking Dish

Preheat oven to 350 degrees
Prep Time 15
Cook Time 1 hr 30 mins

  • 1/3 c. unsalted butter, softened
  • 1 1/2 lbs potatoes peeled and sliced, 1/4 in thick ( I used a mandolin)
  • 1/2 c. plus extra for top, grated Gruyere cheese  
  • 1/2 c. plus extra for top,freshly grated Parmesan cheese  
  • 1 c. heavy cream
  • 1 tsp. salt
  • 1/2 tsp. black pepper
  • 1/8 tsp. paprika 


  1. Grease the baking dish with about 1 tbsp of the softened butter.
  2. Arrange a layer of potatoes in the baking dish and sprinkle the cheeses over them. Continue layering potatoes and cheeses until you've used them all ending with a layer of potatoes.
  3. In a small bowl, whisk the cream with the salt and pepper; pour this over the potatoes. Dot the remaining butter over the top and sprinkle with the paprika. Sprinkle some more cheese on top to finish it off.
  4. Bake for 1 to 1 1/2 hours, or until the potatoes are tender and golden brown on top.
  5.  Let stand for 5 minutes before serving.


Eat and Enjoy!!!

Sunday, September 18, 2011

Clam Boils, White Water Rafting, Camping oh my….

Back in July my hubby and I went up to Maine for a wonderful weekend of camping , filled with good food, great new and old friends, and lots of adventure. My bff and her hubby had invited us to a weekend at the New England Outdoor Center in Millinocket, Maine, never heard of it… its a tiny town 5000 strong, with beautiful mountains, lovely lakes, and some pretty amazing white water rafting.

 The drive up...
The drive there was half the fun, lots of scenic views along the way, we started out early on a Friday morning and managed to get there in the early afternoon. We set up camp.. we actually stayed in shack/cabins..explained in the brochure as four wood walls, tin roof, steel door you get my drift, and boy were they spot on in description. 

While the boys set up camp the girls went exploring, and found this little cove at the lake..


Then onto the clam boil, a New England tradition and one we do every summer. We got some amazing clams and of course some chorizo ( a staple where we are  from) potatoes, onions and sausage. Luckily we had a propane fueled burner to put a big ole pot of boil up. 


After fueling up on food and having some nice campfire talk, it was time to go to bed and get a good nights sleep for our adventure the next day. I will not lie, I was nervous about the white water rafting, first off I wear glasses, never contacts, and I had to wear contacts that day so that was a lot to get used to on a fast moving raft. We woke up that morning to some rain, well more like sporadic downpours, but we realized we were going to get wet anyway so did it really matter?? We went thru the "rafting talk " with the instructors and were then brought by school bus, ( haven't ridden in a big ole yellow bus in quite some time) to the Penobscot River and met our instructor and carried our raft into the water. Once we hit the water the skies opened up and it turned into a beautiful sunny day!! They don't waste any time once your it in the water, this picture below was oh about 3 minutes after we hit the water..

Holy Smokes...

That is our guide "Rabbit" in the back and then me with the look of shear terror on the left and my hubby on the right. In front of us our our friends Amy in front of me ( who stated she wasn't going to paddle when we first got in the raft lol) and Karen ( you can only see her helmet) on the right, oh and their husbands in front of them, well you can't really see them  you can only see the hand of Zack on the right....But I swear they are there...

There they are... after we popped up...

and now calmer seas...


This was probably one of the most exhilarating things I have ever done, oh yeah and the girl that said she wasn't going to paddle( too nervous she said) had an amazing time and after our first Class V could not wait to do it again!!! I am so glad that I did it and we are already planning our next trip for next summer! 


I guess you guys are waiting for a recipe huh.. ok here ya go 

New England Clam Boil
Serves 15

Items needed:

Big ole pot.. or Steamer Pot (like this one)
Long tongs
Red clam boil bags, seafood nets?? Not sure what they are called

  • 15 quarts Steamer Clams, cleaned**** see below
  • 30 sausages links
  • 30 hot dogs
  • 30 chorizo links
  • 3 lbs potatoes, whole
  • 2 lbs onions, peeled
  • 2 bottles beer
  • water 
  • 5 cloves garlic, peeled left whole
  • salt and pepper
  • red pepper flakes
  • Butter 
 
  • We placed each item in its own red bag, and then placed in order potatoes, onions, chorizo, hot dogs, then sausage in the pot.
  • Add the 2 beers, and extra water to cover the potatoes and onions, garlic, salt,  pepper ,and pepper flakes 
  • Let boil/steam for about 40 minutes, sticking a knife or long wooden skewer into the potatoes to check for doneness 
  • Add the clams after about 40 minutes and continue cooking for another 20 minutes until the clams start to open
  • Remove the bags and dig in!!!
  • Put 1 tbs of butter each into small bowls or cups and pour the broth from the pot over to melt and dunk the clams in before eating YUMMY!!!  

 ***** Cleaning Clams: Here is a link  to explain how to clean them, this is pretty much what we did. As it says you can use pepper which we did, the clams don't like pepper (remember they are still alive) and it makes them spit out the pepper and sand.*****


Eat and Enjoy!!


Monday, August 29, 2011

Aren’t they cute!?!?!?


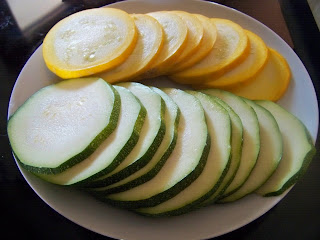
I am extremely lucky I live right down the street from a wonderful Farmers Market that I frequent often, from its opening in April until pumpkin season in November. I love picking out potatoes that still have the dirt on them, and the oh so delicious butter sweet corn, that grows 1/2 mile down the road from my house in their corn patch. I love going without much of a plan to see whats good that day, and when we pulled up these were right up front.  OK so I’ll admit it, half of the reason I got these at the Farmers Market was there cute factor. I couldn’t help myself, I was sent for veggies and veggies I bought. Just real cute ones so much so that I almost didn’t want to cook them up.  I did and they were delicious! They look great and grilled up nicely. These are great simply dressed with salt, pepper and some olive.

  • Green Zucchini
  • Yellow Squash
  • Olive Oil
  • Salt
  • Pepper 

  • Slice veggies in 1/4 thick slices, salt both sides to remove some of the moisture. 
  • Brush with olive oil and sprinkle with pepper, adding a pinch more salt
  • Grill over medium high flame for about 4-5 minutes or until grill marks appear and Zucchini gets slightly limp.


I served these with the Lime Marinated Shrimp


 Eat and Enjoy !!!

Wednesday, August 17, 2011

Lime Marinated Shrimp


Summer time to me means grillin and chillin! When of course its not 100 degrees and humid out…One of our favorite things to grill is shrimp, it’s so fresh and light on hot summer days. There are so many great recipes for grilled shrimp it was hard to decide which one to make. Since I was going to make grilled veggies I wanted something light to go along. I walked into the kitchen and the limes were singing to me. You know that Lime song they sing. So Lime Marinated Shrimp it was. While listening to my limes sing, my hubby brought me a cold beer. This summer my hubby and I have been experimenting with summer brews and have found some great ones. My new favorite and a great pairing with this Shrimp is Summer Shandy!! 
 Its like Lemonade Beer so good!! 

Lime Marinated Shrimp 


Grilled Shrimp 
Serves 2

Items need :

Tuperware with cover
Metal Skewers
Grill or Grill pan

  • 20 uncooked shrimp, shelled and deveined
  • 2 limes, also use for zesting zest
  • salt
  • pepper
  • cayenne
  • olive oil

  • Zest lime or limes... really depends on how much you want , I zested one lime and that was great for us. 
  • Place shrimp in a Tupperware with salt, pepper, dash of cayenne, and the juice of 1 1/2 limes, lime zest and then sprinkle with olive oil. Seal with cover and give a good shake or two. Refrigerate for 30 minutes removing them from the fridge about 15 minutes before you want to grill them.
  •  Heat grill or grill pan over medium high flame/heat, set the shrimp on a paper towel lined plate to absorb some of the excess marinade, a little tip I learned from the O Magazine. 
  • Skewer shrimp.. 5 per skewer ..
  • Grill Shrimp for 2-3 minutes on each side until pink in color and slightly curled. 
  • Serve with lime wedges and some yummy beer.

    Eat and Enjoy!

    Sunday, August 14, 2011

    Chicken Pot Pie


    This has got to be one of my favorite comfort foods, and if I could I would probably eat it at least once a week. My mother used to make it all the time growing up maybe that's why I love it so much. We have had some very rainy days around here and this is one of those comfy yummy recipes that is easy to make for a weeknight meal. This is also one of those recipes that you can play around with in the veggies department. When I have lots of chicken leftover I make some pies for my parents.. that’s right I said pies (plural) When I make this for my parents.. well I have to make two… see my father doesn't likes peas and well mom and my brother do so that means two pies…So you get my drift you can change it to suit your needs.


    Chicken Pot Pie

    Items Needed:
    2 qt sauce pan
    Pie Plate
    Ramekins if making small one

    Pre heat Oven to 425 degrees


    • 1 box Pillsbury® refrigerated pie crusts, softened as directed on box ( I only use one pie crust for the top no bottom but if you do use two follow the instructions for a 2 crust pie )
    • 1/3 cup butter or margarine
    • 1/3 cup finely chopped onion
    • 1/3 cup all-purpose flour
    • 1/2 teaspoon salt
    • 1/4 teaspoon pepper
    • 1 3/4 cups chicken broth (from 32-oz carton)
    • 1/2 cup milk
    • 2 1/2 cups shredded cooked chicken or turkey
    • 2 cups cooked veggies = carrots, peas, corn, potatoes what ever you have on hand
    • 1 egg, beaten

    • In 2-quart saucepan, melt butter over medium heat. Add onion; cook 2 minutes, stirring frequently, until tender 
    • Stir in flour, salt and pepper until well blended. Gradually stir in broth and milk, cooking and stirring until bubbly and thickened.If needed use a whisk to make sure all the flour is incorporated
    • Stir in chicken and mixed veggies. Remove from the heat. Spoon the chicken mixture into a buttered pie plate.
    • Place the pie crust on top of filling and press and flute the edges. Cut slits in several places in top crust. Brush crust with the egg.
    • Bake 30 to 40 minutes or until crust is golden brown. During last 15 to 20 minutes of baking, cover crust edge with strips of foil or one of these to prevent excessive browning. Let stand 5 minutes before serving.

    We serve ours with Cranberry sauce.. not sure if it is a New England thing... but it is oh so yummy!!


    Saturday, June 11, 2011

    Quick Chicken Parm


    Things have been a bit hectic over here so dinner has either been throwing something on the grill or something quick in the oven. Of course with all this crazy weather ( tornadoes 50 miles away in Western Mass) that we have been getting as soon as you decide to grill, a freak storm comes in and bam... Thunderstorms. So this night was no different, we made sure we had charcoal and were all set to grill when the skies opened and guess what no grilling.  So I had to rethink dinner and quick, since we were going to grill chicken and I had been having a craving for Chicken Parm, I went with that.  But who feels like doing the whole breading thing not this girl, not after I thought Hubby was cooking dinner ie the official griller in the fam. So I figured I would throw them in a skillet and voila Chicken Parm for dinner. Honestly this took about 20-30 minutes tops from start to finish.

    Chicken Parm 
    Items needed:
    Skillet
    Baking Dish

    • 5 skinless Thin sliced Chicken Breast
    • salt
    • pepper
    • garlic powder
    • Angel Hair Pasta, Half a box
    • Tomato sauce

    • Bring a pot of water to a boil and drop angel hair cooking per box instructions, drain set aside
    • Heat skillet to medium heat and give a few swirls of olive oil, place chicken in pan, brown chicken 2 minutes, cooking in batches so you dont over crowd the pan
    • Place Chicken in baking dish spread a spoonful of tomato sauce enough to cover nicely then sprinkle a good helping of cheese on top
    • Bake until cheese is bubbly and melted 

      eat and enjoy!

      Monday, June 6, 2011

      Shepherd’s Pie stuffed Potatoes


      Once again back to the Rachel Ray’s Look and Cook book, I think this has been our most used cookbook this month.  This is at least recipe number 2 or 3 from this book, our first one was the awesome Artichoke and Spinach Mac and Cheese.
      The weather last week was awful for Spring with quite a chill in the air like a cool crisp fall morning. So that meant a toss up on what to make except it had to be something warm and comfy of course. I asked the hubby what he was in the mood for and of course got the “ It’s 8 in the morning how can I think dinner??” So I broke out the Look and Cook book because like the title says you can look and then cook, aka it has pictures. I started to flip thru it and bam, he stopped me at this recipe, well the picture of it. And voila dinner recipe is chosen. Of course you know we changed it up a bit, this time because well that’s what we do. Hubby doesn’t like mushrooms, so out they went, and we’re off beef, so sub in Turkey, and we ended up going for a more traditional shepherds pie sub in corn and peas**. These were so delicious that we ate them right away and then I gave some to my parents so I didn't get a melted cheese picture but you get the idea. Of course got this recipe got the wheels turning.. You could stuff potatoes with so many things.. Check out my Shrimp Stuffed Potatoes here

      So here is our version of Rachel’s Shepard's Pie Potatoes recipe.

      Shepard's Pie Potatoes 

      Items Needed:
      Skillet
      Baking Sheet

      • 8 Russet Potatoes, scrubbed clean
      • 3 tbsp EVOO
      • salt

      • 1 lbs ground turkey
      • 2 tbsp soy sauce
      • 2 tbsp Worcestershire sauce
      • 1/4 c ketchup more to taste
      • garlic powder
      • salt
      • pepper
      • 1 package Steamfresh frozen corn, prepared according to package directions

      • 1/4 c milk
      • 2 tbsp margarine 
      • 1/4 c sour cream
      • 6 slices bacon, cooked and crumbled
      • Cheese, shredded 

      • Rub potatoes with the EVOO, and sprinkle with salt than place the potatoes on a foil lined cookie sheet, bake for one hour ten minutes. Remove the potatoes and allow them to cool
      • When the potatoes are cool enough to work with using a sharp knife carefully cut a thin top slice off each one and scoop out the potato flesh, set aside to whip up later. Place shells back on cookie sheet and set aside 

      • In a mixing bowl add the sour cream, milk, and margarine with a hand mixer set on 3 whip the potatoes until a creamy consistency 
      • Meanwhile brown the turkey in a large skillet over medium high heat with 2 tbsp EVOO for about 5-6 minutes, breaking up the lumps as it cooks, add the Soy sauce and Worcestershire and cook another minute than add the ketchup. Adding more or less depending on your preference remove from heat and set aside wiping the skillet clean to use for the bacon 

      • Heat up the skillet to medium high and cook bacon until just crisp ( dont over cook it will cook more in the oven)
      • Fill the potato shells with the turkey and corn mixture and then top with the whipped potatoes and pop back in the oven for 8-10 minute and than remove to put on topping
      • Top the potatoes with the bacon then pile on the cheese and put back in the oven until cheese is bubbly 

      Heres where we forgot to take a picture of the bubbly cheese.... They looked so yummy.. oh well next time!
        ** Ok forgot about the peas... time just got away from me and for some reason I left them out.. guess that means we need to make this again since it was so yummy and try it with peas!!

          Friday, May 20, 2011

          Spinach and Artichoke Mac and Cheese

          Over Chrismakuh I exchange gifts with the girls in my office, we do secret santa, and this year I lucked out, not only did I get a lot of cute little stuff  I also received Rachel Rays cookbook, Look and Cook. I love it, there are so many great recipes, some that we have already made over and over again because we love them so much!! There are several recipes that we earmarked to make and this is one of them. We love all things Mac and Cheese and also love to experiment with different kinds, and this was one we hadn't made at home yet. So when I saw this easy to make and easy on the eyes recipe, I had to make it. In my version I used canned artichokes only because that was what I had on hand but it tasted great anyway. So once again use what have.... 

          Spinach and Artichoke Mac and Cheese 
          ever so slightly adapted from :

          Items Needed:

          Large Stock Pot
          Large Saute pan 
          Casserole Dish

          • salt
          • 1 lb Penne pasta
          • 2 tbsp EVOO – Extra Virgin Olive Oil
          • 3 tbsp butter
          • 1 med onion, finely chopped
          • 3 cloves garlic, finely chopped 
          • 3 tbsp flour
          • 1/2 c. white wine
          • 2 c. milk
          • Freshly grated nutmeg, about 1/4 teaspoon or to taste
          • 1 10-oz box frozen chopped spinach, defrosted and wrung dry in a kitchen towel
          • 1 can quartered Artichokes, slice in half again if desired 
          • pepper
          • 1 1/2 c. Fontina cheese, shredded , plus additional for sprinkling on top
          • 1 1/2 c. Parmigiano cheese, grated,  plus additional for sprinkling on top 

          • Bring a large pot of water to a boil for pasta, salt water and cook pasta to al dente.
          • Meanwhile, place a medium pot over medium-low heat adding 2 tbsp olive oil, and the butter. Add the onion and garlic to the pan and cook the veggies until very soft, about 10 minutes. Then heat the broiler and position rack in the middle of the oven. 
          • Turn the heat up to medium-high and sprinkle the flour into the pan. Cook for about 1 minute then whisk the wine into the pan, cooking for another minute to burn off the alcohol
          • Whisk the milk into the pan and bring up to a bubble. Add the nutmeg, spinach, artichokes, salt and pepper to the sauce and simmer until thickened and vegetables are warmed through, 2-3 minutes more. Add 1 cup of each of the cheeses to the sauce and stir until melted.
          • Toss the prepared sauce with the cooked pasta and transfer to a casserole dish. Sprinkle some more Fontina and Parmigiano over the top and bake until the cheese has melted and the top is golden brown, about 30 minutes.


                Eat and Enjoy!!!!!

                Thursday, May 19, 2011

                Fajita Seasoning Mix


                I love making fajitas and tacos at home and of course would always reach for those already made kits. You know the ones.... shells, seasoning and taco sauce. How easy right? That is until you read or try to read the ingredients list... Half of the words are unpronounceable.. is that a word??  So I looked  up  a recipe and realized that it is so easy to make it at home and it tasted better go figure.... so this has become my go to recipe!!


              • 1 tbsp cornstarch

              • 2 tbsp chili powder

              • 1 tbsp salt

              • 1 tbsp paprika

              • 1 tsp sugar

              • 1/2 tsp onion powder

              • 1/4 tsp garlic powder

              • 1/4 tsp cayenne powder

              • 1/4 tsp cumin


                • Combine all of the ingredients in a small bowl. Pour into small glass or plastic container, seal tightly and store in a cool, dry place.
                • Makes the equivalent of 3 packets of commercial or purchased Fajita Seasoning Mix.

                Tuesday, May 17, 2011

                Crisis Averted!!


                Ok so once again I have been MIA.... this time for good reason... trying to figure out this whole allergy thing. After lots of tests, lots of poking and lots of prodding.. I AM NOT ALLERGIC TO FOOD!! Well that is not to the extent that they thought I was, I am still sensitive to certain foods  and still having some of the same symptoms but am able to control them and not feel like I am dieing.. 


                I have cut beef out of my diet, and have not had any since February, and feel really good about it. I don't miss it and am not lacking in protein, I still eat chicken, fish and shellfish and have a new found love for turkey. Oh and we have joined the Meatless Monday crew and have found some great recipes. It is amazing that once you stop eating something you don't miss it much. I have pretty much been able to substitute a different protein for all my beef favorites!! So now that that's out of the way look for lots for new recipes coming your way!!

                Saturday, February 12, 2011

                Your kidding right????? Allergic to food??!!??


                So once again I have been MIA from the blogoshpere.... This time around it's because I haven't been able to eat that much lately...Over the past two weeks I have been having trouble swallowing, and extreme pain in my chest that I thought was heartburn. I have had heartburn forever and was diagnosed a long time ago with GERD, a hiatal hernia and a Schatzki's ring.. what ever that is... All things I have been able to deal with, by either staying away from triggers or using medication. That was until recently, when I started having the trouble swallowing, which got worse upon eating. So I went to the doctor explained my symptoms, and he immediately scheduled me for a scope and bam.... Eosiniphilic Esophagitis an allergic inflammatory condition of the esophagus, aka a rash on the esophagus... Kind of ironic since my dad is a Dermatologist and we work together... The condition is not well known and rare in women of course... but food allergy may play a significant role.

                What food allergy you ask.... they are unsure and I will probably have to go thru a whole bunch of skin prick tests along with the dreadful elimination diet. Yippe, take away all my food loves....Foods reported to be the cause of EE have included milk, eggs, peanuts, shellfish, peas, beef, chicken, fish, rye, corn, soy, potatoes, oats, tomatoes and wheat. Of these, the most common food triggers are milk, egg, wheat, rye and beef. One course of treatment is inhaled steroids much liked used in Asthma which I will start next week and start the removing certain foods from my diet.
                 
                I guess you take for granted what you can eat when the skies the limit... now the thought of not being able to eat certain foods is no picnic.... So bare with me as I navigate through these food issues and figure out what I am going to eat....

                Monday, January 31, 2011

                We've got a winner!!!!


                What a great response to the giveaway!!!!
                Congratulations to the winner Elisabeth over at food and thrift finds  a wonderful blog filled with fantastic recipes. Go check it out you won't be disappointed.


                Please email me your information so I can get you the fantastic cookbook and breadcrumbs.

                Tuesday, January 25, 2011

                Shrimp Stuffed Potatoes


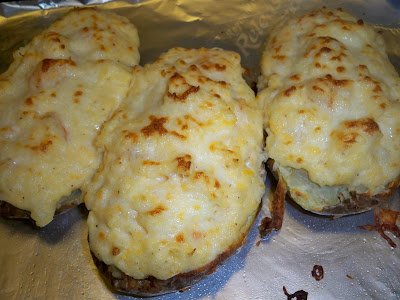
                I was once again trying to figure out what to make for dinner, when I did an inventory of what we had. Hmmmmm besides some leftovers that were going to be lunch for work the next day, I had frozen shrimp and two potatoes. So I hit goggle with a shrimp and potatoes search and the first to pop up was the queen of butter Paula Deans recipe for Shrimp Stuffed Potatoes.Now the irony in this is that my hubby finds her quite annoying… her voice really and the laugh... Whenever he comes home and she is one bam channel change, I like some of her recipes but he does have a point who can be that jolly all the time. I was skeptical of the recipe I'll admit it, but than thought why not we eat shrimp and we eat potatoes all the time so why not together. I have to say it was sooooo good, and we were so glad we tried it. It was creamy and delicious and quite a comforting meal.  This would also be great served as a surf and turf, you’ll also have your “side" with the potato. 


                Shrimp Stuffed Potatoes 

                Items Needed :
                Baking sheet
                Preheat oven to 350 degrees


                • 2 large  potatoes, washed and dried
                • Vegetable oil, for coating
                • 2  tablespoons butter
                • 3/4  cups grated cheddar cheese, plus more for sprinkling
                • 3/4  cups grated Monterey Jack
                • 3/4  cups sour cream
                • Salt and pepper
                • 1 pound shrimp, peeled, and chopped
                 
                • Coat each potato with vegetable oil, place on foil covered pan, and bake for approximately 1 hour.
                • Heat saute pan over medium heat, season shrimp with salt and pepper than saute until browned but not cooked all the way thru, set aside 

                • Remove the potatoes from the oven and slice in half, gently scoop out the potato and place the potato shells back in the oven to crisp up a bit about 5 mins or so
                •  Meanwhile in a bowl place the potato with the butter, sour cream, salt, and pepper. Using a mixer on high, mix the potatoes than fold in the shrimp and both cheeses into the mixture. 

                • Gently stuff the mixture back into the potato shells, making sure not to break them. Pile the mixture as high as you can on top of the potato shells. 

                • Sprinkle each potato with cheese and bake in the oven for approximately 20 to 30 minutes until browned on top. 
                Disclaimer:  Me and the hubby tried these with some BBQ sauce and they were oh so good!!! If you dare try it you wont regret!!


                Eat and Enjoy!!!

                  LinkWithin

                  Related Posts with Thumbnails