Saturday, September 24, 2011

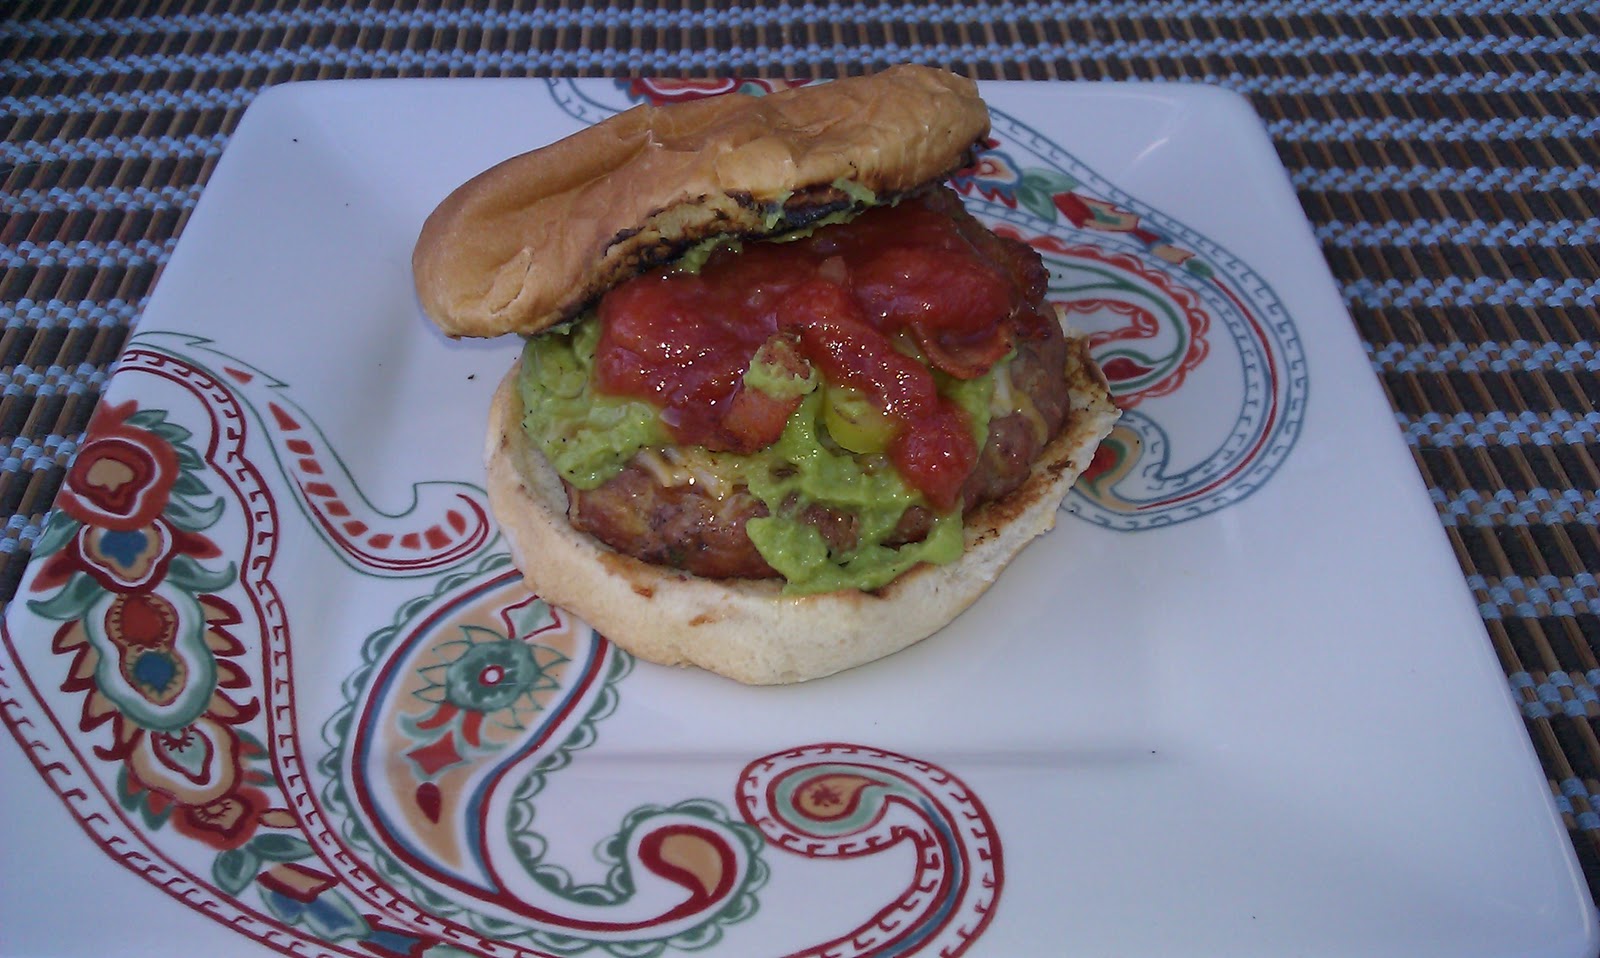
Taco Turkey Burger


With the summer winding down, and the colder weather coming in we have been trying to grill as much as possible. This is one of those oh my gosh what are we going to eat for dinner type of recipes, and since I had some turkey on hand it was really a no brainer. Well the burger idea was a no brainer but what kind of burger was another story. We had just had Teriyaki Burgers so that was out, and I was craving Mexican so why not a taco burger. And boy am I glad I made these yummy burgers definitely a keeper recipe. Here's a little secret to getting your burgers seasoned right; test them by making a tini tiny burger and cooking it in a frying pan and tasting it because really how else can you tell if the seasoning is right.. Well besides eating raw meat.. yuck... I do this with meatballs too, I was always under seasoning them and now that I think about it not a bad idea for meatloaf either. After tasting my tini tiny sample I decided it needed a little something.. I decided on two spoonfuls of salsa added to the meat micture. Ah perfect! 


Taco Turkey Burger 

Item Needed
Grill
Serves 2
Prep time  5 mins
Cook Time depends on desired doneness  

  • 2-3 tbsp taco seasoning
  • 1/2 pkg. ground Turkey
  • salt/pepper
  • Wholly Guacamole,optonal
  • 2 spoonfuls salsa 
  • Salsa Topping,optional
  • Cheese,optional
  • Banana Peppers, optional
  • Sour Cream, optional

  • Season turkey with the taco seasoning, salt and pepper, and two spoonfuls of the salsa then lightly mix it all together and form 2 patties and press a thumb print in the middle (so it doesn't puff up)
  • Now make your tini tiny burger and fry it up.. give a taste, is it ok or does it need more? Add more if it needs if not head out to the grill
  • Grill patties over medium high heat for 5-8 minutes per side, depending on desired doneness  
  • I added a slice of Monteray Jack cheese 1 minute before pulling off the grill
  • Top with your favorite fixin's 

Eat and Enjoy!!

Wednesday, September 21, 2011

Potato Au Gratin


I am a big fan of comfort food, as you may have gathered from some of the recipes on this blog. One of my favorite comfort foods is pretty much anything to do with a potato really, because lets be honest they are just so fluffy and creamy and of course yummy! Now as a kid I remember my mother making this dish but mostly for special occasions and I can see why as it is a bit labor intensive. Now if you have mandolin its easy peasy, which I did, so this went by pretty quick. But it is oh so worth it with this creamy, cheesy bubbly goodness. I found this recipe on Food Network and pretty much followed it to a T, except some extra cheese for the top to get that crispy, bubbly, gooey, cheesy top.

Items Needed:
Baking Dish

Preheat oven to 350 degrees
Prep Time 15
Cook Time 1 hr 30 mins

  • 1/3 c. unsalted butter, softened
  • 1 1/2 lbs potatoes peeled and sliced, 1/4 in thick ( I used a mandolin)
  • 1/2 c. plus extra for top, grated Gruyere cheese  
  • 1/2 c. plus extra for top,freshly grated Parmesan cheese  
  • 1 c. heavy cream
  • 1 tsp. salt
  • 1/2 tsp. black pepper
  • 1/8 tsp. paprika 


  1. Grease the baking dish with about 1 tbsp of the softened butter.
  2. Arrange a layer of potatoes in the baking dish and sprinkle the cheeses over them. Continue layering potatoes and cheeses until you've used them all ending with a layer of potatoes.
  3. In a small bowl, whisk the cream with the salt and pepper; pour this over the potatoes. Dot the remaining butter over the top and sprinkle with the paprika. Sprinkle some more cheese on top to finish it off.
  4. Bake for 1 to 1 1/2 hours, or until the potatoes are tender and golden brown on top.
  5.  Let stand for 5 minutes before serving.


Eat and Enjoy!!!

Sunday, September 18, 2011

Clam Boils, White Water Rafting, Camping oh my….

Back in July my hubby and I went up to Maine for a wonderful weekend of camping , filled with good food, great new and old friends, and lots of adventure. My bff and her hubby had invited us to a weekend at the New England Outdoor Center in Millinocket, Maine, never heard of it… its a tiny town 5000 strong, with beautiful mountains, lovely lakes, and some pretty amazing white water rafting.

 The drive up...
The drive there was half the fun, lots of scenic views along the way, we started out early on a Friday morning and managed to get there in the early afternoon. We set up camp.. we actually stayed in shack/cabins..explained in the brochure as four wood walls, tin roof, steel door you get my drift, and boy were they spot on in description. 

While the boys set up camp the girls went exploring, and found this little cove at the lake..


Then onto the clam boil, a New England tradition and one we do every summer. We got some amazing clams and of course some chorizo ( a staple where we are  from) potatoes, onions and sausage. Luckily we had a propane fueled burner to put a big ole pot of boil up. 


After fueling up on food and having some nice campfire talk, it was time to go to bed and get a good nights sleep for our adventure the next day. I will not lie, I was nervous about the white water rafting, first off I wear glasses, never contacts, and I had to wear contacts that day so that was a lot to get used to on a fast moving raft. We woke up that morning to some rain, well more like sporadic downpours, but we realized we were going to get wet anyway so did it really matter?? We went thru the "rafting talk " with the instructors and were then brought by school bus, ( haven't ridden in a big ole yellow bus in quite some time) to the Penobscot River and met our instructor and carried our raft into the water. Once we hit the water the skies opened up and it turned into a beautiful sunny day!! They don't waste any time once your it in the water, this picture below was oh about 3 minutes after we hit the water..

Holy Smokes...

That is our guide "Rabbit" in the back and then me with the look of shear terror on the left and my hubby on the right. In front of us our our friends Amy in front of me ( who stated she wasn't going to paddle when we first got in the raft lol) and Karen ( you can only see her helmet) on the right, oh and their husbands in front of them, well you can't really see them  you can only see the hand of Zack on the right....But I swear they are there...

There they are... after we popped up...

and now calmer seas...


This was probably one of the most exhilarating things I have ever done, oh yeah and the girl that said she wasn't going to paddle( too nervous she said) had an amazing time and after our first Class V could not wait to do it again!!! I am so glad that I did it and we are already planning our next trip for next summer! 


I guess you guys are waiting for a recipe huh.. ok here ya go 

New England Clam Boil
Serves 15

Items needed:

Big ole pot.. or Steamer Pot (like this one)
Long tongs
Red clam boil bags, seafood nets?? Not sure what they are called

  • 15 quarts Steamer Clams, cleaned**** see below
  • 30 sausages links
  • 30 hot dogs
  • 30 chorizo links
  • 3 lbs potatoes, whole
  • 2 lbs onions, peeled
  • 2 bottles beer
  • water 
  • 5 cloves garlic, peeled left whole
  • salt and pepper
  • red pepper flakes
  • Butter 
 
  • We placed each item in its own red bag, and then placed in order potatoes, onions, chorizo, hot dogs, then sausage in the pot.
  • Add the 2 beers, and extra water to cover the potatoes and onions, garlic, salt,  pepper ,and pepper flakes 
  • Let boil/steam for about 40 minutes, sticking a knife or long wooden skewer into the potatoes to check for doneness 
  • Add the clams after about 40 minutes and continue cooking for another 20 minutes until the clams start to open
  • Remove the bags and dig in!!!
  • Put 1 tbs of butter each into small bowls or cups and pour the broth from the pot over to melt and dunk the clams in before eating YUMMY!!!  

 ***** Cleaning Clams: Here is a link  to explain how to clean them, this is pretty much what we did. As it says you can use pepper which we did, the clams don't like pepper (remember they are still alive) and it makes them spit out the pepper and sand.*****


Eat and Enjoy!!


Monday, August 29, 2011

Aren’t they cute!?!?!?


I am extremely lucky I live right down the street from a wonderful Farmers Market that I frequent often, from its opening in April until pumpkin season in November. I love picking out potatoes that still have the dirt on them, and the oh so delicious butter sweet corn, that grows 1/2 mile down the road from my house in their corn patch. I love going without much of a plan to see whats good that day, and when we pulled up these were right up front.  OK so I’ll admit it, half of the reason I got these at the Farmers Market was there cute factor. I couldn’t help myself, I was sent for veggies and veggies I bought. Just real cute ones so much so that I almost didn’t want to cook them up.  I did and they were delicious! They look great and grilled up nicely. These are great simply dressed with salt, pepper and some olive.

  • Green Zucchini
  • Yellow Squash
  • Olive Oil
  • Salt
  • Pepper 

  • Slice veggies in 1/4 thick slices, salt both sides to remove some of the moisture. 
  • Brush with olive oil and sprinkle with pepper, adding a pinch more salt
  • Grill over medium high flame for about 4-5 minutes or until grill marks appear and Zucchini gets slightly limp.


I served these with the Lime Marinated Shrimp


 Eat and Enjoy !!!

Wednesday, August 17, 2011

Lime Marinated Shrimp


Summer time to me means grillin and chillin! When of course its not 100 degrees and humid out…One of our favorite things to grill is shrimp, it’s so fresh and light on hot summer days. There are so many great recipes for grilled shrimp it was hard to decide which one to make. Since I was going to make grilled veggies I wanted something light to go along. I walked into the kitchen and the limes were singing to me. You know that Lime song they sing. So Lime Marinated Shrimp it was. While listening to my limes sing, my hubby brought me a cold beer. This summer my hubby and I have been experimenting with summer brews and have found some great ones. My new favorite and a great pairing with this Shrimp is Summer Shandy!! 
 Its like Lemonade Beer so good!! 

Lime Marinated Shrimp 


Grilled Shrimp 
Serves 2

Items need :

Tuperware with cover
Metal Skewers
Grill or Grill pan

  • 20 uncooked shrimp, shelled and deveined
  • 2 limes, also use for zesting zest
  • salt
  • pepper
  • cayenne
  • olive oil

  • Zest lime or limes... really depends on how much you want , I zested one lime and that was great for us. 
  • Place shrimp in a Tupperware with salt, pepper, dash of cayenne, and the juice of 1 1/2 limes, lime zest and then sprinkle with olive oil. Seal with cover and give a good shake or two. Refrigerate for 30 minutes removing them from the fridge about 15 minutes before you want to grill them.
  •  Heat grill or grill pan over medium high flame/heat, set the shrimp on a paper towel lined plate to absorb some of the excess marinade, a little tip I learned from the O Magazine. 
  • Skewer shrimp.. 5 per skewer ..
  • Grill Shrimp for 2-3 minutes on each side until pink in color and slightly curled. 
  • Serve with lime wedges and some yummy beer.

    Eat and Enjoy!

    Sunday, August 14, 2011

    Chicken Pot Pie


    This has got to be one of my favorite comfort foods, and if I could I would probably eat it at least once a week. My mother used to make it all the time growing up maybe that's why I love it so much. We have had some very rainy days around here and this is one of those comfy yummy recipes that is easy to make for a weeknight meal. This is also one of those recipes that you can play around with in the veggies department. When I have lots of chicken leftover I make some pies for my parents.. that’s right I said pies (plural) When I make this for my parents.. well I have to make two… see my father doesn't likes peas and well mom and my brother do so that means two pies…So you get my drift you can change it to suit your needs.


    Chicken Pot Pie

    Items Needed:
    2 qt sauce pan
    Pie Plate
    Ramekins if making small one

    Pre heat Oven to 425 degrees


    • 1 box Pillsbury® refrigerated pie crusts, softened as directed on box ( I only use one pie crust for the top no bottom but if you do use two follow the instructions for a 2 crust pie )
    • 1/3 cup butter or margarine
    • 1/3 cup finely chopped onion
    • 1/3 cup all-purpose flour
    • 1/2 teaspoon salt
    • 1/4 teaspoon pepper
    • 1 3/4 cups chicken broth (from 32-oz carton)
    • 1/2 cup milk
    • 2 1/2 cups shredded cooked chicken or turkey
    • 2 cups cooked veggies = carrots, peas, corn, potatoes what ever you have on hand
    • 1 egg, beaten

    • In 2-quart saucepan, melt butter over medium heat. Add onion; cook 2 minutes, stirring frequently, until tender 
    • Stir in flour, salt and pepper until well blended. Gradually stir in broth and milk, cooking and stirring until bubbly and thickened.If needed use a whisk to make sure all the flour is incorporated
    • Stir in chicken and mixed veggies. Remove from the heat. Spoon the chicken mixture into a buttered pie plate.
    • Place the pie crust on top of filling and press and flute the edges. Cut slits in several places in top crust. Brush crust with the egg.
    • Bake 30 to 40 minutes or until crust is golden brown. During last 15 to 20 minutes of baking, cover crust edge with strips of foil or one of these to prevent excessive browning. Let stand 5 minutes before serving.

    We serve ours with Cranberry sauce.. not sure if it is a New England thing... but it is oh so yummy!!


    LinkWithin

    Related Posts with Thumbnails